 Michael Torres
Key Takeaways
- A DCS grill pre-season inspection takes under an hour and should be done before the first cook of the season.
- Spiders build webs in burner tubes while the grill sits idle, and a blocked tube can push gas back toward the control valves.
- Disconnect the gas first, then check the tubes, grates, grease tray, igniters, lid and hose.
- Leak-test every fitting with a one-to-one soap and water solution, watching each for 30 seconds before lighting.
- Do not use the grill if a tube is corroded through, the regulator is damaged or a fitting still bubbles after tightening.
The Bottom Line
Disconnect the gas, clear the burner tubes, check the hose, soap-test every fitting and fire the grill for fifteen minutes before cooking.
A grill that sat under a cover all winter looks exactly as you left it, and that is the trap. Cold, damp and insects do their work out of sight, in the burner tubes, at the igniter tips and in the hoses, and the first you hear of it is a grill that will not light on the first warm weekend or, worse, one that lights unevenly with gas building up behind a blocked tube. A DCS grill pre-season inspection takes under an hour, needs a flashlight, a bottle brush and a spray bottle, and turns that first cook from a gamble into a routine. This guide follows the order that checks the most dangerous items first.
| Part | What to look for | What it prevents |
|---|---|---|
| Burner tubes | Spider webs, debris or insect nests | Gas backing up toward the control valves |
| Gas hose and connections | Cracks, brittleness, abrasion, kinks | Slow leaks near the grill base |
| Igniter electrodes | Dirt, moisture, a tip set too far from the burner | Burners that click and never light |
| Grease tray and cup | Hardened grease, rust through the cup | Flare-ups and grease fires |
| Lid, hinge and grates | Seized hinge, rust, broken rods | A lid that will not seal and grates that fail under load |
What Does a DCS Grill Pre-Season Inspection Cover?
It covers every part that winter storage can quietly damage: the burner tubes, the gas hose and regulator, the igniters, the grease tray and the lid. This site's pre-season safety notice describes it as an essential annual step for DCS Series 9 Evolution and Series 7 grills, before the first cook of the season, and the checklist above is the heart of it.
These grills are built from heavy-gauge 304 stainless steel and made for year-round outdoor use, so the frame is rarely the problem. The trouble is in the small parts, which is why the inspection is about looking closely rather than cleaning hard.
Why Do Spiders Matter So Much?
Because a web inside a burner tube blocks the gas, and blocked gas has to go somewhere. The notice explains that spiders, yellow sac spiders in particular, are drawn to the residual gas scent in burner tubes and build webs there while the grill sits idle. A blocked tube pushes gas back toward the control valves, which the notice calls a fire or explosion risk.
That makes the burner tubes the first item on any spring check, and the reason is worth remembering when a single burner is slow to light or burns weakly. Our DCS grill won't ignite guide covers that symptom in detail.
The Inspection, Step by Step
Work in this order, with the gas supply disconnected until the leak test.
- Disconnect the gas supply before you begin any inspection or cleaning.
- Shine a flashlight into each burner tube and look for webs, debris and nests.
- Remove the tubes if your model allows it, and clear them with a flexible bottle brush, working from the open end toward the burner ports and never the other way.
- Brush the cooking grates with a stiff wire brush and check every rod for breaks before use.
- Empty, wash and dry the grease tray and cup, and replace the cup if it has rusted through.
- Look at each igniter. The electrode tip should be clean and sit close to the burner.
- Open and close the lid a few times to check the hinge moves freely.
- Inspect the hose and regulator for cracks, brittleness, abrasion or kinks, and the connection at the tank for corrosion.
How Do You Leak-Test the Connections?
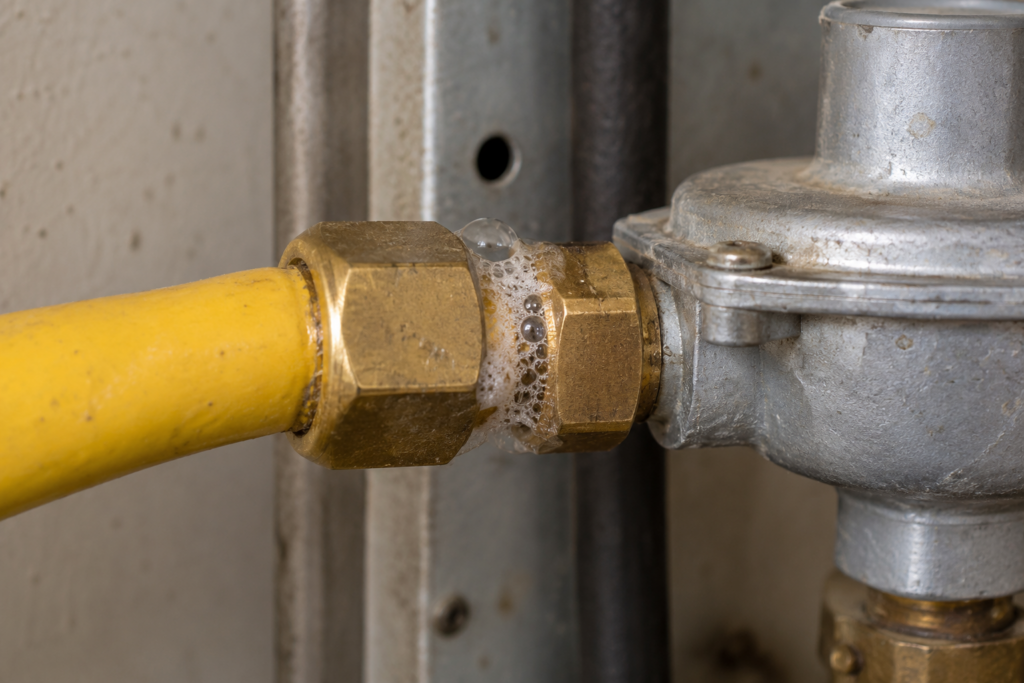
With a soap solution on every fitting, before you light the grill. This site's gas line testing notice recommends doing it every spring before the first use, every time a propane tank is refilled or reconnected, and any time a connection has been disturbed.
- Mix one part liquid dish soap with one part water in a spray bottle or small bowl.
- Open the tank valve or the natural gas shutoff slowly, leaving the grill burner knobs closed.
- Coat every connection: the tank valve, the regulator, and the hose fittings at both ends.
- Watch each point for 30 seconds. Growing bubbles mean a leak, so shut the gas off, tighten the fitting and test again.
- Keep ignition sources at least ten feet away during the test.
If bubbles continue after tightening, the fitting or hose has to be replaced. Wipe off the soap before cooking so it cannot drip into the burner parts. On a natural gas grill the same test applies at the shutoff valve and the flex connector, and the notice stresses that propane is heavier than air and can pool in low spots on a deck or patio, which is why a leak that you cannot smell can still be a leak.
The First-Light Test
Reconnect the gas and run the soap test first if you have not already done so. Then light the burners one at a time and watch how each behaves, since a fault shows far more clearly on a single burner than on the whole grill at once. Then fire the grill on high with the lid closed for fifteen minutes before any food goes on, which burns off moisture and debris. The symptoms you might see correspond to named faults on this site.
- Clicking but no flame at one burner: see the click without ignition page, where a misaligned electrode, moisture and clogged ports near the igniter are the first three causes.
- No ignition at all: the grill no-ignition page lists the safe checks.
- Uneven heat across the grill: a partly blocked tube or port is the likeliest reason, so go back to the brush.
When to Call a Technician
Stop and call if a burner tube is corroded through, if the regulator looks damaged, or if any connection still bubbles after you have tightened it. The notice is firm that the grill should not be used until the leak is resolved and a re-test shows clear. A smell of gas during normal use is an immediate reason to close the tank valve and move away from the grill.
It is tempting to treat a spring check as optional when the grill worked fine last autumn. The notice makes the opposite point: extended low-use periods are exactly when spiders, moisture and hardened grease do their damage, so the grill that looks untouched is the one most worth inspecting. An hour in April is a better trade than a failed burner in July or a gas smell at a family cookout.
Keep a note of the inspection date and anything you replaced, because that history helps a technician and tells you when the next check is due. Our DCS grill repair service covers burners, igniters and gas connections, and the grill maintenance guide and winterizing guide are the companions to this one at the two ends of the season. Book a visit or send us the model and what you found.